We all know that Apple TV’s are great, and we have already taken an in-depth look at how to use a Smart DNS service to stream content that is otherwise blocked due to restrictive (and deeply unfair) licensing terms that seek to maximize copyright holder’s profits by “geo-restricting” content (only allowing viewers located in certain geographic area to access services.)
Fantastic as watching cool stuff on your Apple TV is, there are times when you want to watch shows and movies when you are using other devices. Perhaps you like to watch South Park on your iPhone as you commute to work, or maybe watch movies while at work on your MacBook.
Smart DNS
One great thing about Smart DNS is that it will work on just about any internet-enabled device. It does this by changing a devices’ DNS settings so that they point towards a Smart DNS provider’s DNS server rather than the default one supplied by your Internet Service Provider (ISP). This means that instead of your ISP performing DNS translation (converting domain names such as www.apple.com into the numerical IP addresses that computers understand e.g. 17.172.224.47), this is done by the Smart DNS provider.
Because you appear to be accessing the internet from where this DNS translation occurs, and because Smart DNS providers maintain servers located in various countries around the world, Smart DNS is a great way to avoid artificial geographic limitations. And because the process is very simple (basically just matching domain names to IP addresses on a big database), and therefore requires minimal processing power, Smart DNS is very quick.
This means that you will experience the fastest possible streaming speeds, although you should be aware that since electrons can travel no faster than the speed of light (pesky e=mc2), large distances will always introduce some lag time.
VPN
Another way to geo-spoof your location is to use a Virtual Private Network (VPN) service. VPN will only work on general purpose computers, smart phones, tablets (so it will work on your iOS device and Mac, but not on your Apple TV), and is slower than Smart DNS thanks to having far more computational overheads. This means that for simply unblocking and streaming media content, Smart DNS is usually a better choice than VPN.
However, VPN provides a number of distinct privacy and security advantages. Because the connection between your device and the VPN provider’s VPN server is securely encrypted, your ISP (and anyone looking over its shoulder, such as the NSA) does not have transparency on your activities on the internet.
In addition to this, because all of your internet activity appears to originate from the IP address of the VPN server, your true IP (and geo-location) is hidden from everyone on the internet. Many (but not all) VPN providers go to great lengths to ensure that they cannot know what their customers get up to when surfing the net (for example by keeping no logs, sharing IP addresses among many users etc.) This can provide meaningful levels of privacy to users.
If you can’t choose between Smart DNS and VPN, never fear. Many providers (such as IronSocket) offer both as part of their basic packages. This means that you can setup your Apple TV to stream content via Smart DNS, while at the same time affording yourself privacy while surfing the internet on your Mac. They also allow for VPN usage without encryption, which helps when streaming because there is no encryption bandwidth overhead.
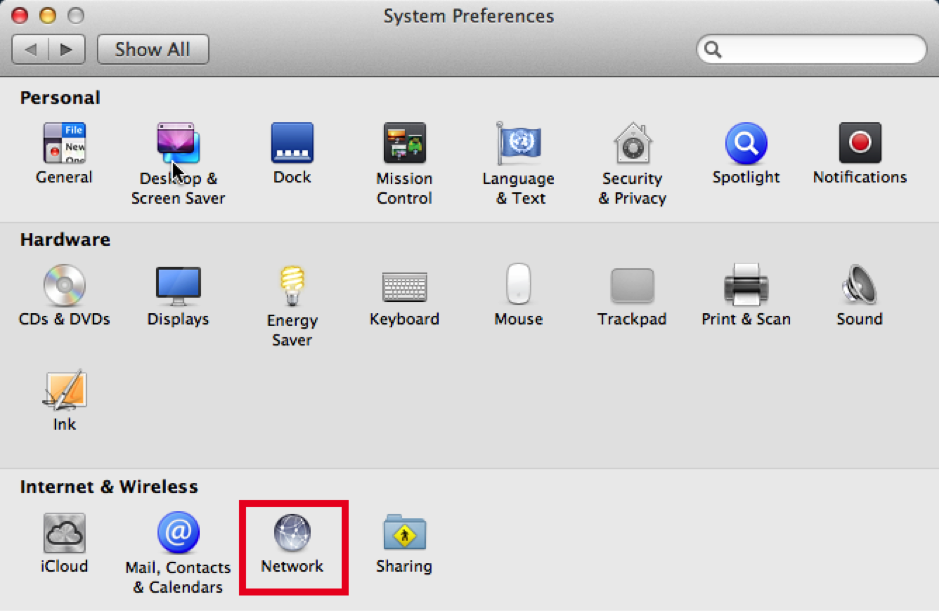
Setting up SmartDNS in OS X:
- Go so “System Preferences”
- Select “Network” (under “Internet & Wireless”)
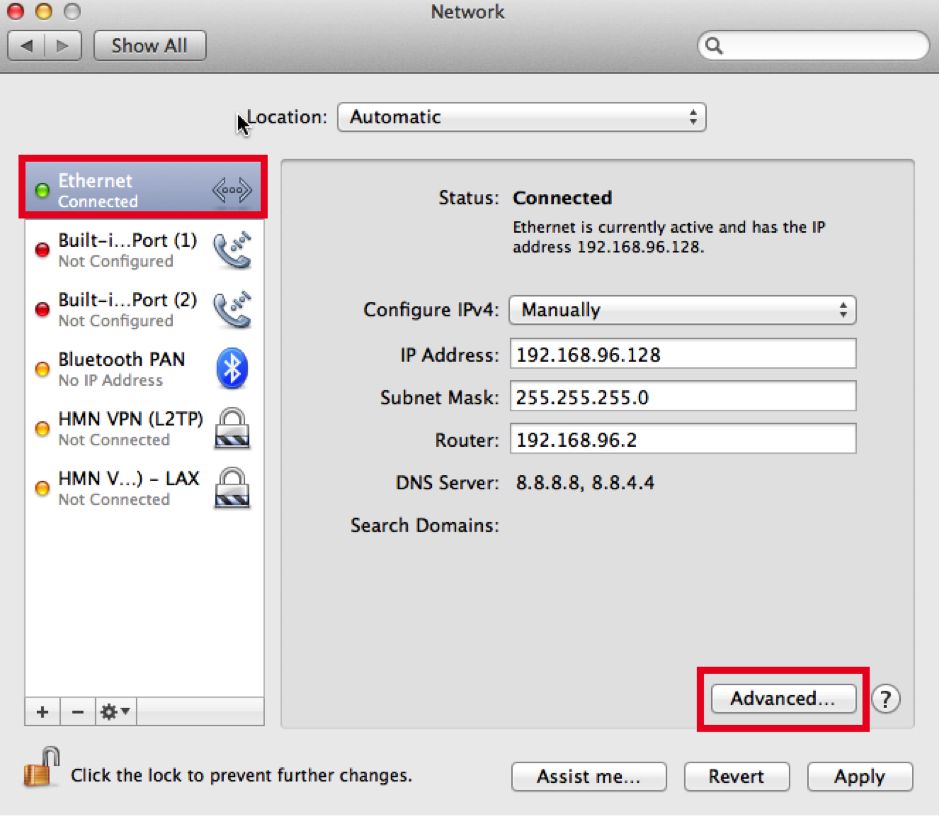
- Select your current network, and then click on “Advanced”
- Select the “DNS” tab
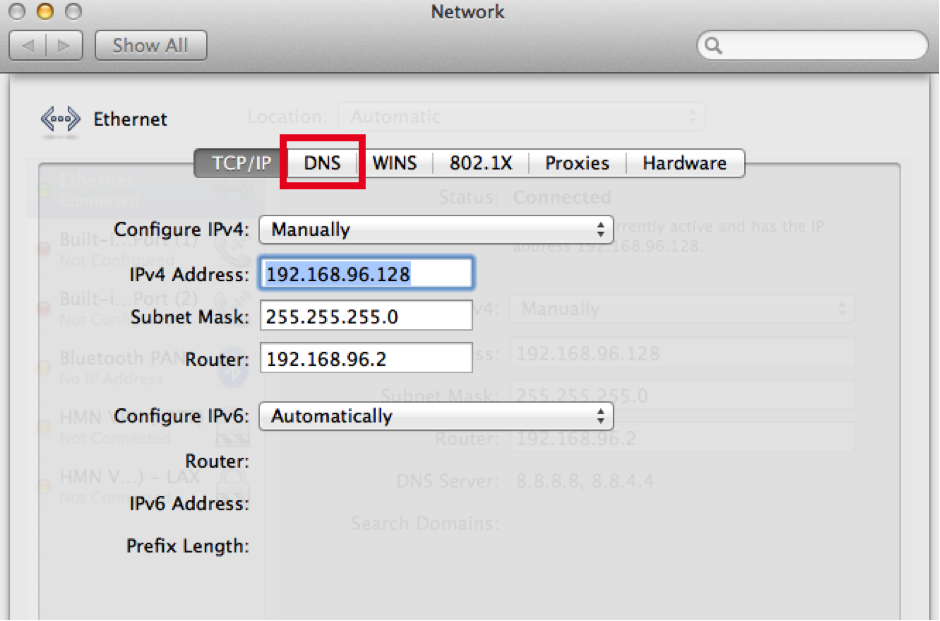
- Remove existing “DNS Servers” by selecting them and clicking the “-” icon. Warning: it is definitely worth making a note of your ISP’s default DNS settings before doing this so that you can easily switch back (very useful if you like to switch between services based in different countries)
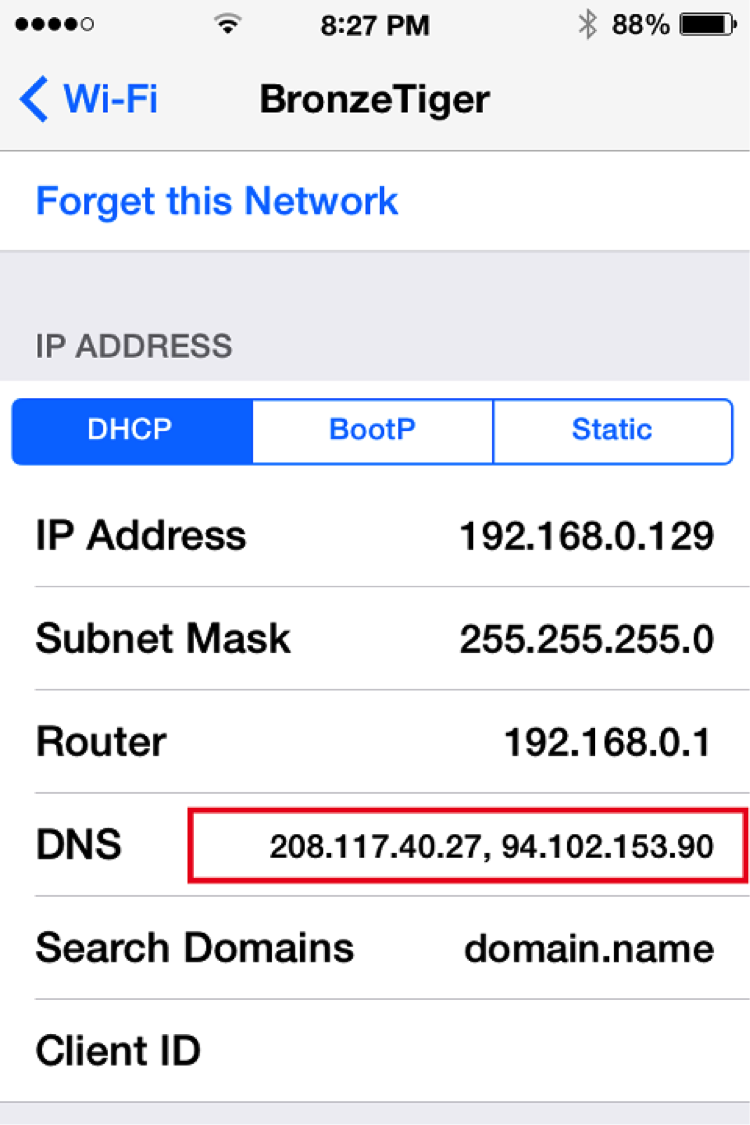
Setting up SmartDNS in iOS 8:
- Go to “Settings”
- Select “WiFi”
- Select current network
- Touch the “DNS” field and change the DNS Address numbers to those provided by your SmartDNS provider. Note: it is definitely worth making a note of your ISP’s default DNS settings before doing this, so that you can easily switch back (very useful if you like to switch between services based in different countries).
- Return to the main menu and perform a “power cycle” (hold the Power button and Home button until the phone restarts).
Conclusion
Smart DNS is a great way to stream geo-restricted content on all your devices – not just on your Apple TV. Just remember, though, that a DNS proxy provides no additional security or privacy. If this is what you are after, then using an encrypted VPN does a great job for that.
Lastly, we are happy to announce that IronSocket has created an exclusive 40% discount coupon for all Apple TV Hacks readers to enjoy and share. Use the coupon code “APPLETVHACKSDNS” at checkout for a yearly subscription rate as low as $2.49 per month.
Be sure to follow Apple TV Hacks on Twitter, Facebook or Google+ for all the latest Apple TV-related news.


Comments
Be The First to Comment