
Here’s the issue: you live or are visiting a part of the world where you cannot access your favorite streaming sites. When you visit Netflix, the following shows:
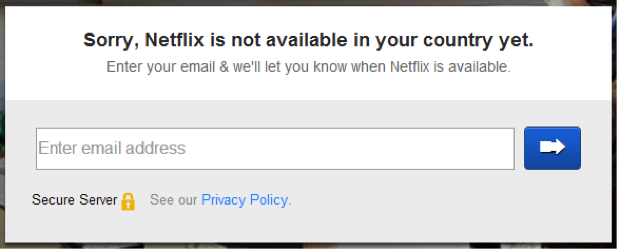
Outrageous, right? There are many other examples of websites behaving this way, even Youtube will block certain videos in certain regions. As frustrating as this is, there is a fast and easy way to unblock websites like Netflix, Youtube, Hulu, Amazon Prime and hundreds more, without using a VPN.
One of the most annoying aspects of this modern digital age where the internet should, in theory, make geographic differences an irrelevancy, is how media makers and distributers enforce arbitrary geographic restriction on who can access their content.
And the reason? Because lucrative licensing deals bring in more profits than treating netizens equally and fairly. This means that people in many parts of the world are only able to access content months after it is available to others (and sometimes not at all), and often only through unnecessarily highly priced channels (such a paying for a premium cable subscription, or even having to purchase DVDs).
Fortunately, getting around these geo-restrictions is easy. One way is to use VPN, but for simply accessing content from abroad, probably the best method is to use a Smart DNS service. One big advantageous favour (and unlike VPN), is that Smart DNS can be configured on any device that connects to the internet, including your Apple TV!
What is Smart DNS? The Solution.
The Domain Name System (DNS) is used to translate domain names (e.g. www.apple.com) into the numerical IP addresses that computers understand (e.g. 17.172.224.47). This translation service is usually performed by your Internet Service Provider (ISP), but it is possible to use a Smart DNS (also known as a DNS proxy) service to do this instead.
Smart DNS services run servers in different countries, and when a device is configured to connect to these, it appears to be located in that country. How many countries are supported depends on the service, but almost all have servers in the United States and the UK.
The US is a popular location as it allows access to streaming services such the Hulu and US version of Netflix (which has a larger selection of content than other regional versions of Netflix, and often makes content available to Americans before anyone else). The UK is popular for its BBC iPlayer, and 4oD streaming services.
What are the advantages of Smart DNS over VPN?
While it provides none of the security and privacy benefits of VPN (which also allows users to “spoof” their apparent location), Smart DNS is in many ways a better choice when streaming media content:
- It works with Apple TV! (as well as devices such as games consoles and “smart” TV’s)
- Less buffering issues – without the need for encryption and other computational overheads (DNS translation is almost instant), using Smart DNS results in less “lag”, so users will experience fewer buffering delays. Do note, however, that if you are streaming from the other side of the world there will still be some latency, as electrons take time to travel over large distances. Blame Einstein!
- When using a computer, only programs configured for Smart DNS will take advantage of the DNS proxy (unlike VPN, where your entire internet connection is routed through the VPN server). This means that you can configure one browser to access the geo-restricted services you want to use, while allowing you do day-today computing using another browser – providing a lower ping rate (less latency), when accessing localized services.
- Smart DNS is usually cheaper than VPN, and many traditional VPN services (such as IronSocket) throw in Smart DNS for free.
How to configure Smart DNS on your Apple TV
Note that is this just a quick summary – more detailed guides (complete with screenshots) are available here.
Apple TV (software version 5.1+)
- Go to Settings -> General -> Network -> Wi-Fi (if using Wi-Fi) -> Configure DNS -> Manual
- Enter the DNS settings supplied by your Smart DNS provider, and click “Done”
- Go to Settings -> iTunes Store -> Location and choose the location you wish to access content from (this must match the location of the DNS server whose settings you entered in Step 2)
- From the main Apple TV menu go to Settings -> Sleep now
- Unplug you Apple TV, wait for 10 seconds, then plug it back in. You should now be good to go!
Apple TV (software version 5.0 and older)
- Go to Settings -> General -> Network ->Configure TCP/IP -> Configure Manually
- Change “DNS” field to the DNS settings supplied by your Smart DNS provider (leave any other settings alone unless your providers tells you otherwise). Hit “Done”.
- Go to Settings -> iTunes Store -> Location, and choose the location you wish to access content from (this must match the location of the DNS server whose settings you entered in Step 2)
- From the main Apple TV menu, go to Settings -> General -> Restart.
IronSocket‘s DNS Proxy service is a fast and easy way to unblock websites like Netflix, Youtube, Hulu, Amazon Prime, Pandora and hundreds more.
It supports over 200 channels and utilize a technology called “Region Switching” for multiple regional channels such as Netflix regions: Brazil, Canada, France, Germany, Ireland, Netherlands and the United Kingdom.
Right now, IronSocket is offering a 40% discount coupon for Apple TV Hacks readers: “APPLEDNS“.
Be sure to follow Apple TV Hacks on Twitter, Facebook or Google+ for all the latest Apple TV-related news.


Comments
Be The First to Comment